Digital Cameras
by Philip Greenspun; created January 2007
Home : Learn About Photography : Making Photographs : Digital Cameras

by Philip Greenspun; created January 2007
Home : Learn About Photography : Making Photographs : Digital Cameras
We've arrived at the last and least important chapter in the text. As noted on the cover page, this is where most photography textbooks start. Your choice of camera will not have much effect on the final image. If you're going to be a working photographer, however, you should know what tools are available.
Here are the factors that go into the choice of a camera for a project:
Suppose that your project demands high image quality and high magnification. For example, you are going to make a 40 x 60 inch enlargement and display it in a corridor where people can walk right up to it to check out fine detail. This requirement pushes you toward using high resolution high quality sensor for the original exposure. That high-res, high-quality sensor may come wrapped in a large relatively heavy camera, which gets us into Factor 3: "How much weight can you carry to the subject?"
Different cameras work at different speeds. With the latest Canon or Nikon autofocus systems, you might be able to capture an unanticipated event on a soccer field. A photographer using a view camera and digital back will not be able to do this; he will still be setting up the tripod, focusing, stopping the lens down to taking aperture, closing the shutter, cocking the shutter, attaching a laptop computer, etc. If your subject is a big mountain, you can probably afford to take your time making the image.
Now that we have the factors in mind, let's dive into the types of cameras available:
Larger sensors offer lower noise at high ISO settings and are therefore essential for taking pictures in low light conditions. The best light for photography is typically fairly dim and therefore using a larger sensor is highly desirable. Unfortunately, the cost of manufacturing a sensor goes up exponentially with size and the largest sensors can cost more than a car.
Here are the standard sizes:
The scanning back, a line of CCD elements that are swept mechanically behind the lens, is a great idea, but it only works for static subjects since the minimum scan time is about one second.
Photo quality in a final print is 200 pixels per inch (the "300dpi" figure that you hear sometimes relates to commercial printing presses and isn't meaningful for digital cameras and digital lab printers). That said, 200 pixels per inch is no guarantee of high quality. The 10-megapixel point and shoot camera may have low contrast and sharpness from the cheap lens plus high noise in shadow areas from the small sensor. You would probably get a better print from an old 6-megapixel digital SLR.
Note that the "print size" is the maximum at which you'll get the kind of print quality that one would have gotten with the best film equipment, enlarged no more than about 10x. By this standard, the largest that you could have enlarged the typical 35mm negative before a noticeable reduction in quality would be 10x15", the same as the 6-megapixel digital SLRs. A 6x7cm medium format negative at 10x will enlarge to 24x28". A 4x5" sheet of film could enlarge to 40x50" and withstand close inspection.
A glossy photographic print has a dynamic range of about 100:1, i.e., the brightest highlight reflects about 100 times more light than the darkest shadow. This is a 6.6 f-stop range, 2 raised to the 6.6 power being close to 100. Ultimately our goal is to represent a real-world scene within this 100:1 ratio. How tough should that be? Things in the real world are either white like the blank photographic paper, black like a shadow printed on the photographic paper, or somewhere in between. You'd therefore naively imagine that a typical real-world scene would have about the same dynamic range as a photographic print.
Materials in the real world, however, are more varied than the photographic paper. Snow is extremely reflective while black velvet or matte black paint have textures that absorb light. Differences in surface properties can push the dynamic range of a real-world scene up over 200:1, which is all the dynamic range you'd need if not for shadows. Consider a granite cliff face with bright white highlights. Add a cave. The interior of the cave will be dark, despite the fact that it is made of the same rock as the cliff. The fact that the cave interior is in shadow and receiving a very different amount of light than the rocks and trees outside adds a huge amount of contrast. Now put a black bear inside that cave and try to take a photo that captures detail in the shadowed-by-the-cave bear's face and the lit-by-the-sun cliff face. You're struggling with as much as 16 f-stops of dynamic range or 64,000:1. For practical purposes, a high-contrast real-world scene is usually limited to 1000:1, or 10 f-stops.
Thus the digital photographer is presented with two challenges: (1) capturing the full range of tones that are present in a scene, (2) figuring out how to map those tones into the more limited range that is representable in a finished print.
How many bits are necessary to capture our 1000:1 scene? As 2 raised to the 10th power is 1024, one would naively suppose 10 bits, but, since the RAW files are encoded linearly, that would leave only two levels in the dark shadows: on and off. The result would be banding in the shadows. We will have to add a couple of extra bits to ensure the same number of levels that the human eye can distinguish. We therefore need at least 12 bits per color, which is coincidentally what the mid-range digital camera RAW formats provide. That will be sufficient to capture a high-contrast scene, assuming the exposure setting is perfect. The expensive digital camera backs, some of which incorporate electronic cooling to reduce sensor noise in the shadows, offer a 12 f-stop dynamic range and output 16 bits.
What if you capture JPEG files, in effect asking the camera to do the RAW to JPEG conversion? A standard JPEG encodes 8 bits per color or 256 levels and incorporates a gamma factor so that the numbers do not linearly correspond to luminance. The human eye can distinguish roughly 200 levels with the 6.6 f-stop range of a final print. Therefore a perfectly exposed and converted JPEG ought to be adequate for making the best possible final print. Unfortunately, in practice, the exposure won't be perfect and the computer in the camera won't make the same same decision that you or a professional darkroom technician would about how highlights and shadows ought to be mapped into the print tones.
Unless you're going to do all of your photography in a studio with controlled lighting and a calibrated camera-to-printer setup, you must have a camera that outputs RAW files with at least 12 bits per color. This rules out nearly every point and shoot-style camera.
Well, they're compact, but due to the small sensor and small lens, you can almost always get substantially higher image quality if you're willing to carry a larger camera. The megapixel count will undoubtably be high, but the contrast and sharpness will be low and the shadow noise high. Very few P&S cameras provide a RAW capture option, so the number of luminance levels is limited to 256, only 1/16th as many as you'd get with a 12-bit RAW from a low-end digital SLR. We cover point and shoot cameras in a separate article.
A single lens reflex (SLR) is a camera in which the same lens is used for viewing and taking pictures. A mirror in the body directs the light from the lens up into a prism for viewing, then flips up out of the way just before an exposure is made. Note that this is not an exotic technology; the standard Nikon or Canon camera body (photo at right) is an SLR.
Suppose that the photographer has chosen an exposure of f/8 and 1/125th of a second. Here is how most SLRs work during exposure:
SLR manufacturers generally provide a range of interchangeable lenses. This works out nicely because changing the lens simultaneously changes the scene magnification on film and in the viewfinder. It is tough to mix and match brands. Camera bodies and lenses are coupled mechanically and electronically in non-standard ways. A lens for a Canon EOS body won't fit a Nikon body and vice versa.
The best thing about an SLR is that what-you-see-is-what-you-get. If you've left the lens cap on, fitted a really long telephoto, attached a strange filter, you can see the effect in the viewfinder.
One obvious problem with an SLR is weight. The prism on top of the body that lets you see a properly-oriented image is heavy.
Another problem with the SLR is noise. The mirror is light but it has to be flipped up as fast as possible, which is necessarily noisy. Photographers who work during live theater or concerts often surround the camera in a "blimp" to muffle the noise.
A final problem with an SLR is exposure latency. If you wait for the decisive moment and press the shutter, the camera doesn't take a picture until it has stopped down the lens and flipped up the mirror. This takes between 50 and 100 milliseconds for the average SLR, which can be reduced to about 40 milliseconds by using the mirror lock-up custom function. A standard digital camera uses the final 40 milliseconds to register dark current levels from the image sensor. These levels vary based on temperature and other conditions, and must therefore be updated for every picture or sequence of exposures.
[Do not confuse an electronic viewfinder (EVF) point and shoot camera with a true mirror-and-optics SLR. The EVF camera is sending light continuously to the sensor and feeding the sensor output to a little TV screen on top of the camera. Physically the format is very similar to a true SLR, but current TV screen technology isn't nearly as good as current optics.]
More on this kind of camera: "Building a Digital SLR System".
The simplest camera would include the following components:
Such cameras have been common since the invention of photography and are known as lens-shutter cameras.
With a lens-shutter or rangefinder camera, you can't look through the lens. You view the image through a separate optical viewfinder. The image that you take home will be a bit different than what you viewed due to parallax: the viewfinder isn't exactly aligned with the lens.
It turns out that people aren't very good at estimating distance precisely. So companies began putting military rangefinders into lens-shutter cameras, coupled to the lens and the viewfinder. The photographer turns a ring on the lens until two superimposed images are aligned in the viewfinder. The only digital cameras that include traditional optical/manual rangefinders are the Epson R-D1 and the Leica M8. Both accept lenses from the Leica M film camera system, which are designed for the 24x36mm frame of 35mm film. Both the Epson and Leica digital rangefinders incorporate a small sensor, thus multiplying the effective focal length of the old lenses. These cameras accept a large range of lenses and therefore use a shutter just in front of the sensor, i.e., a focal-plane shutter.
If you put an autofocus and autoexposure mechanism into a traditional lens-shutter camera, what do you have? A consumer's point and shoot camera.
Without the mirror and prism, lens-shutter cameras can be much lighter and more compact than an SLR using the same sensor. With no mirror to slap, lens-shutter cameras are also quieter than SLRs.
There is no mass market for high quality digital rangefinder cameras and therefore the cameras that are available are much more expensive that SLRs that produce the same image quality. The image quality of the best SLRs is not available at any price from a digital rangefinder.
If you're not happy about paying Canon $2500 for a 24x36mm sensor
wrapped in a fancy electronic body
(
To what kinds of cameras do these digital backs attach? View cameras and medium format SLRs.
A medium format SLR is easy to understand. It has all of the same components as the familiar Canon and Nikon SLRs, but everything has been scaled up. Hasselblad, Mamiya, and Rollei were the leading manufacturers of these cameras in the film days. They usually engineered the camera body and the film back in separate pieces. In the studio you'd attach the Polaroid back to check the lighting with a few test exposures ($3 each, kids!). Then you'd attach a back loaded with slide film for a few photos. If you wanted to be 100 percent sure that you had something usable, you'd attach a second back loaded with more forgiving color negative film for insurance. Standard frame sizes included 45x60mm, 60x60mm, and 60x70mm. When digital came along, it was only natural that people would engineer a back to fit the existing inventory of camera bodies and high quality lenses.
How well do these systems work? The most integrated is the Hasselblad H3D. The manufacturer claims "the ease of use of the best 35mm DSLRs", which means "not as fast or easy to use as a Canon or Nikon, but the fundamentals of viewing and photographing will probably work better."
 What is the fundamental limitation with a medium-format SLR? The lens
and the film are fixed parallel to each other. We can remove that, at
the expense of ease of use, by attaching the digital back to a view
camera.
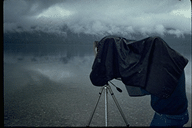
View cameras are the most flexible cameras, usually made from a basic design that has not changed for over 100 years. A view camera is a light-tight bellows with a bracket at one end for a lens and a bracket at the other for the digital back. You compose and focus your image on a groundglass, then displace the glass with a sheet of film or a digital back. Adding to the challenge is the lack of a mirror or prism, which means that you view the image upside down and reversed left-to-right.
Why work this hard to take a photo? The flexibility of arbitrarily positioning lens and sensor opens up a huge range of creative opportunities that are unavailable to most photographers. For example, if you want to take a photo of a building, the obvious thing to do is point the camera up towards the center of the structure. However, this results in projecting the vertical exterior of the building onto the angled sensor surface. The lines of the building will converge towards the top of the frame. A view camera allows you to keep the camera level with the ground and either shift the lens up or the digital back down. The sensor is now "looking up" at the building through the lens, but the sensor is still parallel to the building exterior so lines don't converge.
If you're taking a picture of rocks in a stream with a view camera, you can achieve sharper focus by tilting the lens forward a bit. This will get the Scheimpflug Rule working for you: the planes of the subject, the lens, and the sensor should all intersect in a line. You can achieve the same result by leaving the lens fixed and tilting the sensor back a bit. This will improve the focus and also increase the relative prominence of nearby rocks since they will be stretched out onto the film.
A complete view camera system consists of the camera, a couple of lenses, the digital back, a dark cloth, a focusing loupe, a tripod, etc. Complete with protective case, it will weigh at least 30 lbs. and you will agree with the wise 8x10" photographer who said "If it is more than 100 yards from the car, it's not photogenic."
Companies that make digital backs include Hasselblad, Leaf, MegaVision, Phase One, and Sinar.
Any camera can be a panoramic camera. You need only take a digital file to a professional laboratory and say "make me a long skinny print from a portion of the file". Or take a file to any lab and say "make me a big print from this file". Once you get home, use a pair of scissors to trim the big print until it is long and skinny and contains the subject matter of interest. If your subject isn't moving and you are equipped with a tripod, you can improve the image quality dramatically by taking four or five overlapping images and stitching them together into one big long file.
If you want the maximum in convenience and image quality, there are purpose-built wide-angle and 360-degree panoramic cameras that incorporate a line of CCD sensors and a motor to scan the sensors behind the lens. The folks at Roundshot will be happy to sell you one for about $30,000. Keep in mind that, with a scanning back, different portions of the image will be captured as much as a few seconds apart. Files range in size up to 470 megapixels.
This chapter is meant to provide background, not purchasing advice. We try to keep some current practical advice in the following articles: