Canon EOS 1Ds Mark III Review
by Philip Greenspun; created January 2008 and revised March 2008
Site Home : Photography : 1Ds Mark III
by Philip Greenspun; created January 2008 and revised March 2008
Site Home : Photography : 1Ds Mark III
There has never been any question that the Canon EOS 1Ds produces the best quality images of any handheld digital camera on the market. The only question has been whether or not you wanted to pay $8000 and crush your shoulders under the weight of this monster.
What do you get with the Mark III incarnation of the EOS 1Ds? The weight, with battery but not lens, has come down from a ridiculous 3.5 lbs. to a painful 3 lbs. Resolution is up to 21 megapixels (from 12 in the original 1Ds and 16 MP in the Mark II version). That is 5600x3700 pixels, large enough to make superb prints at 20x30" and acceptable prints beyond 30x40".
Dynamic range in RAW files is 14 bits per color, up from 12 bits in previous 1Ds bodies.


The 1Ds Mark III turns on almost instantly and is very responsive, on par with the cheaper Canon bodies that are not tangling with 25 MB RAW images. The camera can capture 5 pictures per second, but it can't write them to the memory cards that fast. After you've captured about 56 JPEGs or 12 RAW images, the viewfinder and top-deck LCDs will read "BUSY" for a few seconds until some of the images have been saved, freeing buffer memory for additional photos.
The 5 frames per second capture rate of the 1Ds Mark III is similar to the best film SLRs (without accessory power boosters), but significantly slower than the 10 fps of its sports photography crop sensor cousin, the 1D Mark III. It is also slower than the EOS 40D body, which offers a 6.5 fps rate. This can make a difference when trying to capture peak action during an atheletic event, for example.

At first glance, the 1Ds Mark III appears easy to operate. There are the familiar Canon control wheels, one just behind the shutter release and a thumb-wheel on the back of the camera. The first hint that the camera might not be so simple is the presence of three external LCD displays: top deck, rear monitor, rear icon panel. Where should you look to find a particular piece of information or verify a particular camera setting? It isn't obvious.
The familiar top-deck control wheel ("mode dial") from Canon's cheaper digital SLRs is chucked due to its susceptibility to dust, moisture, and failure. To change among exposure modes, you press a couple of bottoms on the top left of the camera while simultaneously turning the main control dial.
In some ways the interface is simpler than on Canon's lower-end bodies. There are no idiot modes so you don't have to wonder what the camera will do when set to the flower icon, the "running guy" icon, or the "green box" icon. You choose among Metered Manual, Aperture-priority, Shutter-priority, and Program autoexposure. You choose between One Shot (subject not moving) and AI Servo (subject moving) autofocus modes.
In most ways, however, the interface is much more complicated. The menus are deeper. There are more buttons. There are choices about which of the two memory cards you would like the camera to write to. Or maybe you want it to write to both simultaneously?
The camera includes a fast processor, massive internal memory, and high-resolution 3" screen. Would a "help" or "more info" option on the menu choices and custom functions be too much to ask for?

There are 45 autofocus sensors in this camera. With an f/2.8 lens, all 45 sensors function, 19 of which are high-precision sensors, reponding both to vertical and horizontal lines. With an f/4 lens (or f/2.8 lens with 1.4X teleconverter), only the center AF sensor responds to vertical lines; the other sensors look at horizontal lines only. At f/5.6 (kit zoom lens or f/4 + teleconverter), the central sensor loses its vertical sensitivity. At f/8, a maximum aperture at which Canon consumer bodies don't even try to autofocus, the central AF sensor responds to horizontal lines. This is useful when trying to do wildlife photography with a compact kit, e.g., 300/4 and 2X converter or 400/5.6 and 1.4X teleconverter.
Autofocus is supposed to function in light as dim as EV -1 (ISO 100), i.e., light that would require an exposure of 1 second at f/1.4 with an ISO setting of 400. With an external flash attached in dim light, the camera will instruct the flash to shine a red "AF-assist beam" on the subject, unless Custom Function III-14 is set to disable the beam.

The viewfinder image is large, bright, and shows 100 percent of the image to be captured... just like a 1959 Nikon F. The in-viewfinder displays, one underneath and one on the right side, show more information than the heads-up display on an F-16 fighter jet. The bottom LCD shows metering pattern, f-stop, shutter speed, autoexposure lock, flash ready, exposure or flash exposure compensation, white balance correction, capacity of storage media, ISO speed, focus confirmation. The right-side display shows ambient and flash exposure meters (+/- 3 f-stops), the number of photos that can be stored in the camera's burst buffer, whether RAW or JPEG format is selected, and a battery charge level icon.
It is easy to view the entire viewfinder image and the one-line LCD display underneath, even while wearing eyeglasses. It is not easy, even without glasses, to see both in-finder LCD displays and the image. To facilitate use without eyeglasses, the Canon 1Ds Mark III has a built-in diopter adjustment (-3 to +1).
If the Canon 1Ds Mark III is mounted in a place where you can't see through the optical viewfinder, you can view the image to be captured on the 3" rear LCD, on a television set connected via an included cable, or on a personal computer connected via a USB cable (software included).
How does Live View work? The mirror is flipped up, darkening the optical viewinder and sending all of the light to the sensor. This disables the autofocus system, whose sensors are in the viewing path, upstream from the mirror. To focus, press the "zoom in" button on the rear of the camera for 5X or 10X magnification, set the lens for manual focus, and turn the focus ring on the lens.
Pressing the depth of field preview button stops down the lens to taking aperture and simultaneously enables "exposure simulation". The LCD image gets brighter or darker as aperture and shutter speed are changed in metered manual (M) mode.
Battery life in Live View mode is short; Canon says to expect to capture about 300 images on a fully charged battery.
Those who have the patience to read every page of the owner's manual will learn that Live View heats up the sensor, degrading image quality. Internal temperatures can rise enough to become damaging, resulting in an obscure thermometer icon appearing. The photographer is supposed to recognize this icon and turn off Live View. The rear high-resolution LCD could display a text message: "Your $8000 camera is heating up to damaging temperatures; please turn off Live View." But it doesn't, on the theory that the owners will have read and remembered every page in the owner's manual.
For maximum sharpness at high magnifications, either with macro or telephoto lenses, it helps to swing the mirror up in advance of opening the shutter. This is most important at shutter speeds between 1 second and 1/30th of a second.
The Canon 1Ds Mark III offers mirror lock-up capability via Custom Function III-15. Once enabled, a single press of the shutter release locks up the mirror. After the vibration of the mirror slam has subsided, a second press will take the picture. How can this reduce vibration and increase image sharpness if a clumsy human keeps touching the camera? It can't, unless you attach a remote release or use the self-timer. For landscape photography, put the camera on a tripod, set exposure and focus manually, enable mirror lockup, set the self-timer mode to 2 or 10 seconds, and press the shutter speed just once for each image. The mirror will lock up as soon as the shutter release is pressed. Two seconds later, the shutter will open and the picture get taken. Two seconds should be enough for the vibration of the mirror and the vibration of a finger on the shutter release to dissipate.
Some of Canon's film bodies had a mode in which mirror lock-up was enabled only with the self-timer. This was very useful for travel photography when the camera was on and off a tripod because it is so easy to switch in and out of self-timer mode (the "drive" button). The EOS 1Ds lacks this capability; switching in and out of mirror lock-up mode involves wading through a series of menus.

The Canon 1Ds Mark III has two card slots, one for Compact Flash card, either Type I and II, and one for an SD card. Each RAW image is 25 MB, which means that you can store about 40 images per gigabyte (GB). Start with either a 16 GB CF Card or the announced-at-CES 2008 32 GB SD cards from Panasonic.
Busy photojournalists will appreciate the ability to write images simultaneously to SD and CF cards. The camera can be set up to write RAW files to one card and JPEGs to the other. Hand the JPEG card to a newspaper editor; keep the RAW card for a possible book.
To make it easier to caption images back at the office, the camera can associate a 30-second sound clip with an image. Simply press and hold the microphone button while an image is being reviewed.
I had trouble formatting two SanDisk Ultra II 8 GB cards in the camera. These cards had previously worked perfectly in a 5D body, but the 1Ds kept saying "Could not format. Change card1." Supposedly this problem has been fixed with the 1.0.6 version of the firmware.
The Canon 1Ds Mark III does not have a built-in flash, but it can control the full range of Canon's external flashes.
Adjusting flash settings is about as easy as using Windows Vista. Want to show a natural looking motion blur behind a sharp flash-exposed subject? Second curtain sync for the flash requires the following steps:
Resume taking photos with a 550EX flash and you'll find that... the flash fires when the first shutter curtain opens. Give up and take a bunch of photos, like the one at right, where the motion blur is in front of the moving subject. Return home, pull out the manual and discover that settings on the flash override those on the camera. Search in vain for a second curtain sync switch on the 550EX. Press all of the buttons on the flash. Go to the Canon USA Web site. Navigate through the menus. Discover that the owner's manual for the 550EX is not available. Do a Google search and discover that some kind soul has uploaded the PDF file. Go to page 98 and discover that second curtain sync is settable on the flash. You only need to press the + and - buttons simultaneously. That puts the flash into "high speed sync mode". The press the + and - buttons simultaneously again. That puts the flash into second curtain sync mode, indicated by a multi-segmented arrow.
[Why no built-in flash for $8000 you might ask? It would be difficult to maintain effective weather sealing with a traditional pop-up flash. In addition, the prevailing wisdom is that professional bodies should not have built-in flashes because professionals travel with assistants carrying a full complement of powerful external flashes.]
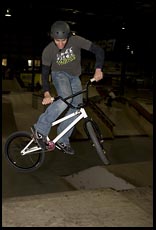
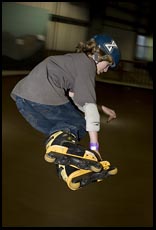
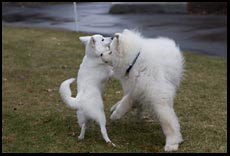
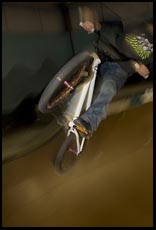
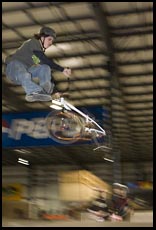
Here are a few photos from an indoor skateboard and BMX bike park (Rye Airfield in New Hampshire). The lens was a 50/1.4 with autofocus set to "AI servo" (continuous).

|

|
|
| mostly flash |
no flash ISO 800, f/5.6 and 1/15th |
mixed ISO 800, f/5.6 and 1/15th ETTL flash -2/3 stop |
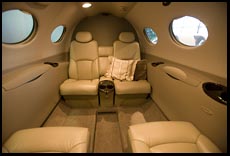
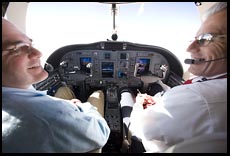
Despite having physically smaller sensor sites than the EOS 5D, the 1Ds Mark III tested slightly better in noise control at high ISO settings. See image at right of a Cessna Mustang interior, captured at ISO 1600, for an example of the value of ISO 1600 in practical situations.
Autofocus performance in low light is slightly better than the 5D, down to EV -1 compared to the 5D's EV -0.5.
To compare the 1Ds Mark III to the 5D, I photographed a bookshelf at ISO 1600 and ISO 3200, with the 24-105/4L IS lens. Exposure with both cameras was f/4 at 1/30th for ISO 1600 and f/4 at 1/60th at ISO 3200. I compared the images, which were all too unaesthetic to display here, in Adobe Photoshop. With both cameras, ISO 3200 was visibly noisier than ISO 1600. Viewed at the same image magnification, images from the 1Ds looked slightly less noisy than those from the 5D. Enabling Custom Function II-2, "High ISO speed noise reduction", did not improve the quality of the 1Ds RAW images nor did a simultaneously produced JPEG look better than the RAW once opened in Photoshop. The 5D does not have a comparable custom function.
Verdict: Don't spend an extra $6,000 over the 5D for acceptable 8x10 prints at high ISOs.

Despite what must be a power appetite on par with a gamer's PC, Canon claims that the enormous Lith-ion battery is adequate for capturing 1800 photos at room temperature; 1400 when freezing. To recharge the battery, you must travel with a charger that is larger than a Digital Rebel XTi.
For important photographic projects, carry a backup LP-E4 battery.
In our testing, the battery held a nearly full charge for three calendar weeks with light usage.

Want to transfer a file from, say, the SD card in the camera to your personal computer? It is as easy as unplugging the card from the camera and plugging it into the SD card reader on your PC. Then you discover that the SD card reader won't read "SDHC" cards, i.e., those with capacities greater than 2 GB. So you say "It might be a little slow, but I'll just plug a USB cable into the camera and transfer the files over USB 2.0." Then you discover that the camera shows up in Windows Explorer, but not as a disk. Nor can the Microsoft Camera Wizard figure out how to pull files out. That is when you turn to the software CD-ROM included with the camera and install the "EOS Utility" that can pull files from the camera's cards over USB and onto the local hard drive.
You'd expect a camera this heavy to include Wifi and cell phone data network communications capabilities. What good is a photo if you can't share it with someone else? Canon offers a bag-on-the-side WFT-E2A "wireless file transmitter" for about $800, i.e., roughly the cost of a note PC that would include Wifi, Bluetooth, and cell phone data network. The WFT-E2A lacks cell phone data capability and Bluetooth and offers only Wifi. It is therefore is useful in the studio, but not in the field. The WFT-E2A is not compatible with the current 802.11n standard, only the older and slower 802.11b and 802.11g standards.

The Adobe Camera Raw 4.3.1 plugin (for Lightroom and Photoshop CS3) can decode RAW images from the Canon 1Ds Mark III. The JPEGs on this page were generated with Photoshop CS3 and my personal scripts that you can download. The Picasa program from Google should eventually understand the 1Ds Mark III's RAW files.
If you decide to go the Photoshop/Bridge route, you might find The DAM Book: Digital Asset Management for Photographers (Peter Krogh; O'Reilly 2005) helpful.
Make sure to enable "auto rotate" (first tools menu) so that an image captured with the camera held vertically will appear on a computer screen in a vertical orientation.
Canon includes software with the camera, but it is not as good as Picasa (free), Adobe Lightroom, or Adobe Photoshop/Bridge. Working with the 25 MB RAW images is painfully slow. In Adobe Bridge, for example, when trying to decide whether a photo is a keeper, the software gives you the ability to zoom in on a portion of a thumbnail. On a dual-core 2.8 GHz Pentium with 3.5 GB of RAM, this takes 15 seconds, compared to 7 seconds for a 12 MB image from a Canon 5D. A top of the line personal computer starting in mid-2009 should be able to handle these images without frustrating delays.
The 1Ds Mark III is Canon's most durable body, designed to withstand heavy rain, hard knocks, desert sand and dust, etc. The camera can be set to write images to two memory cards simultaneously, thus preserving the images even when half of the camera has been shot away by hostile fire.
An automatic sensor cleaning function activates when the camera is turned off.
If a photographer had infinite money, would he or she buy the 1Ds Mark III? Maybe not. The pain of spending $8000 might soon be forgotten by some folks, but the 3 lb. weight will be a constant reminder that an adequate job could have been done with the full-frame 5D (2 lbs.).
Sports photographers will prefer the
Nikon is the only company that might conceivably make a competitor to the 1Ds. So far they haven't tried. The closest that Nikon comes to an attempt to compete with the 1Ds is the Nikon D3. The D3 has a full-frame sensor, but with about half of the resolution of the 1Ds Mark III. Where the D3 is superior to the 1Ds Mark III is in the ability to capture usable images at an ISO setting of 25,600, three f-stops more sensitive than the 1Ds Mark III's ISO 3200.
Nikon, starting with their D40 camera, seems to be ahead in the user interface department, exploiting the personal computer-like capabilities of the camera to explain settings with text and example photographs.
Can you get better image quality from any camera than from the 1Ds Mark III? Sure, but not in a camera that you would want to handhold all day. The realm of higher quality belongs to medium format digital backs, rolled into systems such as the Hasselblad H3D, the Leaf AFi, and the Sinar Hy6. These systems are intended for studio use, weigh even more than the 1Ds, and cost $30,000+. The medium format systems are designed to work with studio lighting and therefore may underperform the 1Ds at higher ISO settings.
If you have an extra $20,000, a tripod, and a lot of light, look into the medium format backs. These systems will get very interesting when a large square sensor is available, e.g., close to the 56x56mm full frame of 6x6 film camera. Currently the sensors are 36x48mm, which wastes a lot of the image circle and has all of the disadvantages of a rectangular format, e.g., figuring out a way to tilt the camera sideways or rotate the back.
Elsa Dorfman uses a 20x24" Polaroid camera. We decided to see how a print made from an EOS 1Ds Mark III RAW file would compare to a 20x24" original. The images below were taken using ISO 50, available only after enabling extended ISO range from a custom function menu. This is slower than the native resolution of the camera and is probably slightly lower image quality than ISO 100, but it was useful because it enabled us to use an f/8 aperture with the powerful strobes in Elsa's studio.
Lens Original 100 percent crop
50/1.4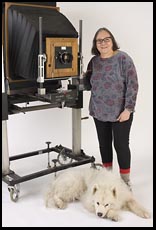

50/2.5 macro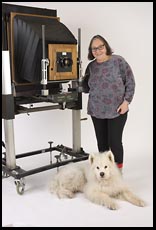

85/1.2L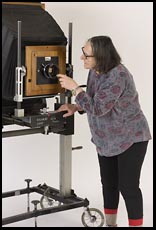

Note: The inset images were filtered with Unsharp Mask at the following settings: 75 percent, 1 pixel radius, 0 threshold. They were then saved in .png format.
We sent the RAW files to Pictopia and gave them no instructions other than "make the best 20x30 print that you can". In a side-by-side comparison with a few Polaroid originals, Elsa and three other viewers agreed that the 1Ds Mark III images had at least as much detail as the Polaroid. It was a little tough to compare because the Polaroid images have less depth of field and the papers were very different. The Polaroid paper is super thick and glossy; Pictopia's least expensive RA-4 paper has a matte finish and is much thinner. The digital image was much cleaner, while the Polaroid had a lot of waviness and character in the background. As an imaging system for making 20x30" prints, the Canon EOS 1Ds Mark III combined with Pictopia was the clear victor. As artistic statements, the Polaroid images were more interesting.
Most new cars have GPS. The EOS 1Ds Mark III plus an L lens feels about as heavy as hanging a Hyundai around one's neck. Why shouldn't the camera body include a GPS chip and geotag images with the latitude and longitude of the exposure location? Canon's theory for how you would do this is to buy a WFT-E2A "wireless file transmitter" to attach to the side of the body, then buy a separate GPS and plug that into the WFT-E2A via a USB cable.
As noted previously, the EOS 1Ds Mark III includes a fast processor, massive internal memory, and high-resolution 3" screen. Why not add a tiny touch of software and text strings to include a "help" or "more info" option with most menu and custom function controls? The information in the owner's manual wouldn't occupy more than 1/1000th of a RAW image; why should the photographer be forced to carry around the owner's manual on paper?
The EOS 1Ds Mark III is a remarkable display of engineering prowess.
Do you need a weatherproofed camera that is strong enough to drive
nails while producing the world's best image quality? If so, the 1Ds
is a bargain. If not, the
I never wanted a 1Ds. Now I do. But probably I'll wait for the revision of the EOS 5D.
Text and pictures copyright 2008 Philip Greenspun.