Light
by Philip Greenspun; created June 1999 and revised January 2007
Home : Learn About Photography : Making Photographs : Light
by Philip Greenspun; created June 1999 and revised January 2007
Home : Learn About Photography : Making Photographs : Light
One can define photography as "the recording of light rays". That's why taking a good picture depends so much on choosing the lighting carefully.
"He spoke with the wisdom that can only come from experience, like a guy who went blind because he looked at a solar eclipse without one of those boxes with a pinhole in it and now goes around the country speaking at high schools about the dangers of looking at a solar eclipse without one of those boxes with a pinhole in it."
-- Joseph Romm
You can get plenty of light out of the sun, that's for sure. However, you might have to wait a bit if you want the light to have the quality that you need for your picture.
At high noon on a clear day, the sun is extremely strong. It generates a hard light with deep crisp shadows. It also is coming from directly overhead.


The hardness of the light will generate dark shadows. The direction of the light will place those shadows in unattractive positions underneath the subject's eyes and nose. One solution is to move the subject into the shade where he will be lit by skylight rather than sunlight. Skylight comes from a large source and is therefore diffuse. Diffuse light does not cast strong shadows. Skylight is also rather blue and, if you are using color slide film, you might have to place a warming filter (e.g., 81D) over the lens to get natural skin tone.
If your goal is to record a subject in front of a sunlit object then you can't move him into the shade. There is too great a difference in illumination between shaded and sunlit objects. Photographic film and paper cannot handle the same range of contrast as your eyes. A picture that is correctly exposed for the sunlight object will render the shaded portrait subject as solid black. A picture that is correctly exposed for the shaded portrait subject will render the sunlit background object as solid white.
The best solution is to wait for the light to be coming from a different direction and/or for different weather. Near sunrise or sunset, you might be able to get flattering light on both the portrait subject and the background object. On an overcast day, light from the sun will be sufficiently diffused that the shadows become faint.
If they couldn't wait, professionals would most often deal with this situation by dragging out diffusers and reflectors. In the diffuser case, an assistant holds a huge plastic-framed white cloth between the sun and the subject. In the reflector case, an assistant holds a silver, gold, or white reflector underneath the subject to push sunlight back up into the subject's face, filling the shadows.
Finally, there is artificial light. If you stick a powerful flash on the camera, pointed at the subject, then the light from the flash will augment the light from the sun. Because the flash light is filling in the shadows, this is known as fill flash. Electronic flash is the same color as the sun around noontime. If you use electronic flash closer to sunset or sunrise, when sunlight is redder, objects illuminated by the flash will look unnaturally cold. Professionals deal with this by carting around assistants who cart around colored filters to paste over the flash tube.
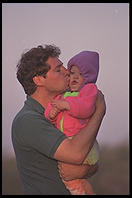 |
cousin Douglas holding our 2nd cousin Julia This picture illustrates the virtue of waiting for sunset. Note the warm tones and even illumination. Nikon 8008, 80-200/2.8 AF zoom lens, Fuji Reala |
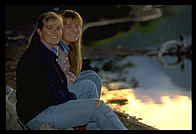 |
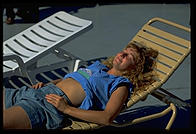
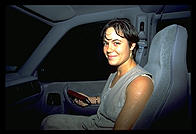
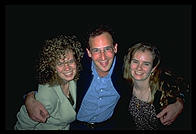
These two interesting women (from Travels with Samantha, Chapter V) would have been rendered as silhouettes if I hadn't used a touch of fill flash from my Nikon SB-24 (mounted on an 8008 body which was mounted on a tripod. Lens: 80-200/2.8; film Velvia.) |
It is difficult to see the shape of the landscape when the sun is directly overhead. Our eyes rely on shadows to recognize shapes. Nonetheless it is occasionally possible to get a good landscape photo at midday if the subject is reasonably compelling, especially if you are aiming at the kind of descriptive photos found in travel brochures.
|
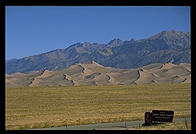
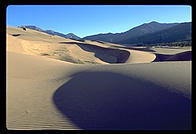
Left: Great Sand Dune National Monument, rather boring in the flat light of 11 am. Right: The same sand dunes but much more interesting earlier in the morning. |
|
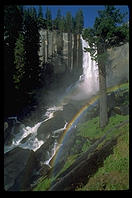 |
Vernal Falls, Yosemite National Park Taken around 3 pm, the light in this image is pretty bad and casts harsh shadows. The cloudless and therefore uninteresting blue sky might make a Chamber of Commerce calendar but doesn't make art. Of course, the rainbow makes it all worthwhile and it might not have been there at sunset. Or the light might not have been falling on the waterfall. Nikon 8008, 28mm AF lens, Fujichrome Velvia |
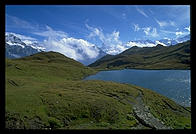 |
Bachalpsee Because of the saturated colors rendered by the then-new Fuji Velvia slide film, I'm not sorry that I had my Nikon out in the mid-afternoon in the Bernese Oberland (Switzerland). Nikon 8008, 20/2.8 AF lens, Fujichrome Velvia |
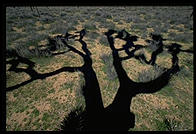 |
Joshua Tree Shadow, Joshua Tree National Park One of the good things to do when the light is overhead and harsh is look for interesting shadows. Canon EOS-5, 17-35L lens, Fujichrome Velvia |
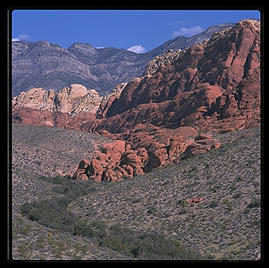 |
Red Rock Canyon, west of Las Vegas The interest in this photo comes from the different colors of the landscape. Rollei 6008 (6x6 format), 180mm lens, Fuji Astia |
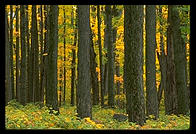
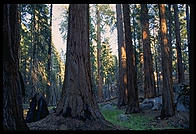
A high overcast is perfect for a lot of photography. A studio photographer would think of this as "the mother of all softboxes". If you want to capture architectural details, an overcast day lets you do it without shadows obscuring anything. Overcast and/or rainy days are also the times to go into the forest and take pictures of trees. The one bad thing that you can say about an overcast day is that a big white sky makes a very bad photographic subject. Try to make sure that your photos have hardly any sky in them.
Overcast skies are slightly more blue (7000 degrees Kelvin) than the color temperature for which daylight film is designed (5500 K; a mixture of direct sun and skylight). Officially, the Kodak Professional Photoguide will tell you to use an 81C warming filter. I wouldn't bother unless you are photographing clothing for a catalog. [For comparison, open shade from a clear blue sky is 11,000 or 12,000 degrees Kelvin and requires an 85C filter.]
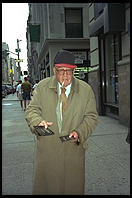 |
If you wait long enough in New York City ... someone will probably steal your camera. So maybe it is best to just shoot in whatever light you can find. Here I used the fill flash on my point & shoot camera. |
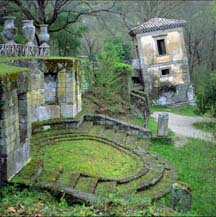 |
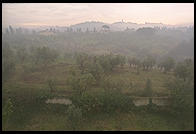
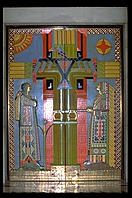
Below the town of Bomarzo, Italy (1.5 hours north of Rome). This was the park of the 16th century Villa Orsini and is filled with grotesque sculptures. Rollei 6008, Fuji Velvia, Zeiss 50mm lens, tripod. Probably f/22 and 1 second. Note that part of the foreground is unsharp. There wasn't quite enough depth of field. Note that the composition completely excludes the uninteresting overcast sky. |
|
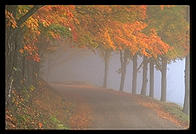
Left: Vermont, where a little white sky pokes through. Right: California where the weather is often too sunny for good forest photography. |
|
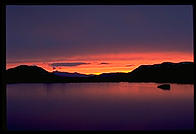
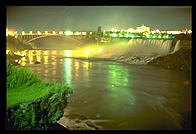
There is no reason to put the camera away after the sun goes down. In
fact, you can usually get your best pictures then. You'll often need
exposures of 30 seconds or longer, however. Here are some photos from
Chapter XV of Travels with
Samantha as examples...
|
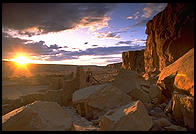
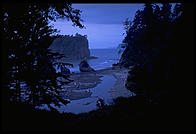
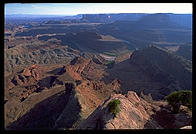
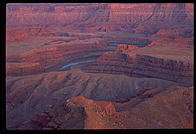
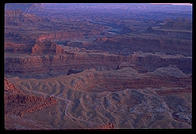
Canyonlands (Utah). At left, note the unpleasant contrast shortly before sunset. I could have driven 200 miles to get to a better spot relative to the sun. But instead I just waited until the sun had set and got the image at right. |
|
|
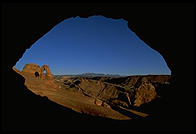
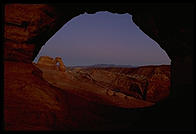
Arches National Park (Utah). At left, before dark. At right, after dark. |
|
Strictly after dark...
There isn't much to say here except make sure you have a tripod.

Street lights are not blackbody radiators so you can't even talk about their color temperature. They discharge in various narrow spectral bands and the color that this produces on a digital sensor or film isn't very predictable or controllable. Usually you get an eerie green light, which I personally find kind of interesting.
The Kodak
Professional Photoguide has a page devoted to filtration suggestions
for street lights, but you have to know the brand of bulb in use!
Long-tube fluorescent fixtures are designed to offer diffuse unobtrusive light. As such, they make for reasonably good black and white photography. In a typical office, start out at f/1.4 and 1/60th of a second at ISO 400 (note that this means you will need a high-speed lenses, such as a 50/1.4 for a full-frame camera or a 30/1.4 for a small-sensor camera).
For color photography, fluorescent lights have some of the same
properties as street lights, i.e., they discharge in narrow spectral
bands. In the old film days you would have to place a "fluorescent
-> daylight" (FL-D) filter over the lens in an attempt to
compensate. With a digital camera, set the white balance to
"fluorescent" and/or capture in RAW format and adjust the white balance
on the computer back home.

Standard light bulbs are much warmer than daylight, only about 2900 K
for a 100-watt light bulb. In the film days, you would get a very
pronounced yellow cast without a blue filter over the lens (Kodak says
80A + 82B). With a digital camera, set the white balance to the little
light bulb icon and/or capture in RAW format and adjust post-exposure.
The electronic strobe, invented by Doc Edgerton in 1931 at MIT, was a great scientific instrument, helped win the war against Germany by facilitating night aerial reconnaissance photography, and contributed to the 1970s disco craze. Sadly, however, the electronic flash has done more to ruin the average photograph than any other new technology.
In the good old days, even amateur photographers were reasonably careful about light. You took your subject out on a high overcast day. You placed your subject next to a large window. You stuck your camera on a tripod.
What do we do now? Point and shoot without thinking. The camera will automatically blast the subject with light from the built-in strobe if there isn't enough ambient light. Thus, 90% of our subjects come out with that "deer in the headlights" look.
Remember the sentence above: "Our eyes rely on shadows to recognize shapes." There are no useful shadow cues if all the light comes from the same angle as the lens. You can't establish a mood with on-camera flash. You can't emphasize a feature with on-camera flash. You can't narrow a fat face. You can't really do anything except capture a scene that never existed (unless you are a coal miner and walk around with a headlamp all day).
Does that mean that you should throw out your electronic flash? No. A built-in flash that fires straight ahead is useful for filling harsh shadows in bright sunlight. An accessory flash designed to slide on top of the camera can be a great tool when used properly.
 Accessory Flash Strategy 1: Get the flash off the camera. Most
modern digital SLRs let you control an off-camera flash wirelessly,
usually with an accessory that slides into the hot shoe on top of the
camera. A more bomb-proof alternative is to use an "off camera" cord
that has a bundle of wires to repeat all of the little contacts on the
hot shoe. These cord cost roughly $50. Separating the light from the
lens by just an arm's length makes a huge difference. If you can't
afford to devote one hand to holding the flash and don't have an
assistant, use a flash bracket, e.g., those made by Stroboframe. These
are what wedding photographers use.
Accessory Flash Strategy 1: Get the flash off the camera. Most
modern digital SLRs let you control an off-camera flash wirelessly,
usually with an accessory that slides into the hot shoe on top of the
camera. A more bomb-proof alternative is to use an "off camera" cord
that has a bundle of wires to repeat all of the little contacts on the
hot shoe. These cord cost roughly $50. Separating the light from the
lens by just an arm's length makes a huge difference. If you can't
afford to devote one hand to holding the flash and don't have an
assistant, use a flash bracket, e.g., those made by Stroboframe. These
are what wedding photographers use.
 Accessory Flash Strategy 2: Bounce the light off the ceiling. We
expect light to come from above, either because that's where the sun is
or because a lot of buildings and houses have overhead lights. If you
are in a room with a reasonably low, reasonably white ceiling, then you
need only tilt the flash head up and direct the light towards the
ceiling. The problem with this approach is that it sometimes mimics
noon sunlight too well. You get harsh shadows under the eyes and
pronounced shadows. Metz makes a couple of handheld flashes that have
two tubes, one that always fires straight ahead and one that can tilt
up. This is probably the best technology, but most people are stuck
with a one-tube flash. See Strategy 3 below.
Accessory Flash Strategy 2: Bounce the light off the ceiling. We
expect light to come from above, either because that's where the sun is
or because a lot of buildings and houses have overhead lights. If you
are in a room with a reasonably low, reasonably white ceiling, then you
need only tilt the flash head up and direct the light towards the
ceiling. The problem with this approach is that it sometimes mimics
noon sunlight too well. You get harsh shadows under the eyes and
pronounced shadows. Metz makes a couple of handheld flashes that have
two tubes, one that always fires straight ahead and one that can tilt
up. This is probably the best technology, but most people are stuck
with a one-tube flash. See Strategy 3 below.
Accessory Flash Strategy 3: Attach a Diffuser. There are a variety of diffusers that will send some of the light up to the ceiling and some straight out toward the subject. My personal favorite is the Sto-Fen Omni-Bounce. This is a translucent plastic cube that snaps on to the front of the flash in about 2 seconds. It costs less than $20 and is made in different sizes to fit many brands of flashes. Usually, I stick it over a big Canon flash and tilt the flash head up 45 degrees. This seems to send about one-quarter of the light forward, one-half up to the ceiling, and one-quarter off in various other directions. LumiQuest makes a bunch of similar products but I have found them a bit too cumbersome. Finally, you can get small softboxes (see the studio flash section) to cover your flash. The disadvantage of any diffuser is that it wastes a lot of light, thus reducing your flash range and increasing recycle time.
Accessory Flash Strategy 4: Get Another Flash. If you are willing to invest in a second flash and a rat's nest of custom cables (Canon and Nikon) or some air (Minolta with its brilliant wireless system), then you can light the background and the subject separately, fill shadows, and otherwise play most of the tricks available to studio photographers. The custom cables will ensure that your camera body shuts off the flashes when there is sufficient exposure, but it would probably be better to use manual flashes and a flashmeter if you are very concerned about lighting ratios. The cabling doesn't solve the problem of supporting the second or third flash. You might need light stands in which case it would have been almost as easy to drag along a couple of studio monolights.
For color photography, the electronic flash has one nice feature: it is designed to have roughly the same color temperature as daylight. So you don't need any filters to work with standard daylight-balanced film.
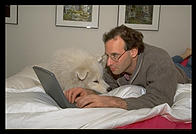 |
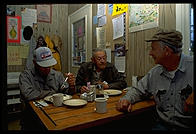
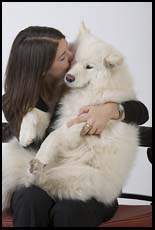
Canon EOS-5, 20-35/2.8L, 540EZ flash tilted up 45 degrees, +2/3 stop flash exposure compensation, Stofen Omni-bounce, Kodak E100 slide film We wanted a boring flat illustrative light and we got it. This photo would have been ruined by standard on-camera flash. Standard bounce flash off the white ceiling would have been better, but probably it would have left unpleasant shadows under eyes and chin. The Omni-bounce worked beautifully here, casting light all around the room. Canon's auto flash exposure worked great too, though because of all the white in the image, it was a good thing that we dialed in +2/3 stop compensation. |
 |
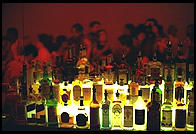
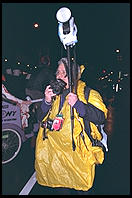
On-camera flash at its most horrifying: as the primary light. But if you've got a standard point and shoot camera in your pocket and you are in a dark theater, this might be the best you can do. Note how the background has become 100% black, due in part to the ISO 50 film used, Fuji Velvia, which also contributed the ruddy flesh tones. (from Travels with Samantha, Chapter III) |
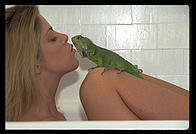 |
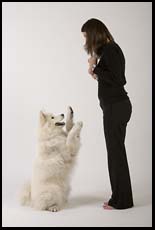
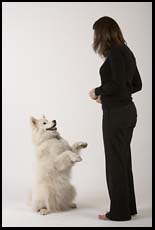
Another success for the Sto-Fen diffuser. Note that this was done in a bathroom with white tile and white walls. Canon EOS-5, 70-200/2.8L lens, 540EZ flash |
Please see my studio photography primer.
Please see my studio photography primer.
"Contrast" by Emily Dickinson:
A door just opened on a street--
  I, lost, was passing by--
An instant's width of warmth disclosed,
  And wealth, and company.

The door as sudden shut, and I,
  I, lost, was passing by,--
Lost doubly, but by contrast most,
  Enlightening misery.
Next: Lens.